8.1 KiB
| uid |
|---|
| addressables-groups |
Groups
A group is the main organizational unit of the Addressables system. Create and manage your groups and the assets they contain with the Addressables Groups window.
You can control how Unity handles assets during a content build by organizing your Addressables into groups and assigning different settings to each group as required. See Organizing Addressable Assets for information about how to organize your assets.
When you initiate a content build, the build scripts create AssetBundles containing the assets in a group. The build determines the number of bundles to create and where to create them from both the settings of the group and your overall Addressables system settings. See Builds for more information.
Note
Addressable Groups only exist in the Unity Editor. The Addressables runtime code does not use a group concept. However, you can assign a label to the assets in a group if you want to find and load all the assets that were part of that group. See Loading Addressable assets for more information about selecting the assets to load using labels.
Managing groups
To manage your groups and Addressables assets, open the Addressables Groups window by going to Window > Asset Management > ** Addressables** > Groups. See Addressables Groups window for details about the features of this window.
Create a group
To create a group:
- Open the Addressables Groups window - to Window > Asset Management > Addressables and select Groups.
- Select Create in the toolbar to open the Create menu.
- Select Group > Packed Asset to create a new group. (If you have created your own Group Templates, they are also displayed in the menu.)
- Select the new group and right-click (mac: cmd + click) to open its context menu.
- Select Rename and assign the desired name.
- Open the context menu again and select Inspect Group Settings.
- Adjust the group settings as desired.
For groups containing assets that you plan to distribute with your main application, the default settings are a reasonable starting point. For groups containing assets that you plan to distribute remotely, you must change the build and load paths to use the remote versions of the Profile path variables. (To build AssetBundles for remote distribution, you must also enable the Build Remote Catalog option in your Addressable System Settings.)
See Group settings for more information about individual settings.
Manage assets in a group
Adding assets to a group
Use one of the following methods to add an asset to a group:
- Drag the assets from the Project window into the Group window and drop them into the desired group.
- Drag the assets from one group into another.
- Select the asset to open it in the Inspector window and enable the Addressables option. This adds the asset to the default group. Use the group context menu to change which group is the default group.
- Add the folder containing the assets to a group - all assets added to the folder are included in the group.
Note
If you add assets in a Resources folder to a group, the Addressables system first moves the assets to a non-Resource location. You can move the assets elsewhere, but Addressable assets can't be stored in a Resources folder in your Project.
Remove assets from a group
Select one or more assets in the Groups window and right-click (macOS: cmd + click) to open the context menu, then select Remove Addressables. You can also select the assets and press the Delete key to remove the assets from the group.
Add or remove labels
Select one or more assets in the Groups window, then select the label field for one of the selected assets.
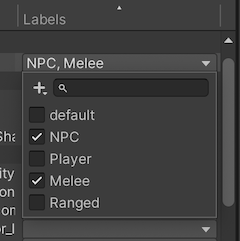
Assigning labels
To assign labels, enable or disable the checkboxes for the desired labels.
To add, remove or rename your labels, select the Plus button, then select Manage Labels. To only add a new label, select the Plus button and then select New Label. See Labels for more information on how to use labels.
Group context menu
To open the Group context menu and access group-related commands, right-click (macOS: cmd + click) on a group name.

The Group content menu
| Command | Action |
|---|---|
| Remove Group(s) | Removes the Group and deletes its associated ScriptableObject asset. Unity reverts any assets in the group into non-Addressable assets. |
| Simplify Addressable Names | Shortens the name of assets in the group by removing path-like components and extensions. |
| Set as Default | Sets the group as the default group. When you mark an asset as Addressable without explicitly assigning a group, Unity adds the asset to the default group. |
| Inspect Group Settings | Selects the group asset in the Unity Project window and in the Inspector window so that you can view the settings. |
| Rename | Enables you to edit the name of the group. |
| Create New Group | Creates a new group based on a group template. |
Asset context menu
To open the Addressable Asset context menu and access asset-related commands, right-click (macOS: cmd + click) on an asset.
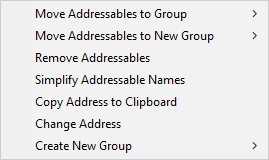
Addressable Asset context menu
| Command | Action |
|---|---|
| Move Addressables to Group | Move the selected assets to a different, existing group. |
| Move Addressables to New Group | Create a new group with the same settings as the current group and move the selected assets to it. |
| Remove Addressables | Remove the selected asset(s) from the Group and make the asset(s) non-Addressable. |
| Simplify Addressable Names | Shortens the names of the selected assets by removing path-like components and extensions. |
| Copy Address to CLipboard | Copies the asset's assigned address string to your system Clipboard. |
| Change Address | Enables you to edit the asset's name. |
| Create New Group | Create a new group based on a group template. This doesn't move the selected assets. |