13 KiB
Important: This page is subject to change during the 2019.1 beta cycle.
Particles Simple Lit Shader
In the Universal Render Pipeline (URP), use this Shader for particles where performance is more important than photorealism. This Shader uses a simple approximation for lighting. Because this Shader does not calculate for physical correctness and energy conservation, it renders quickly.
Using the Particles Simple Lit Shader in the Editor
To select and use this Shader:
- In your Project, create or find the Material you want to use the Shader on. Select the Material. A Material Inspector window opens.
- Click Shader, and select Universal Render Pipeline > Particles > Simple Lit.
UI overview
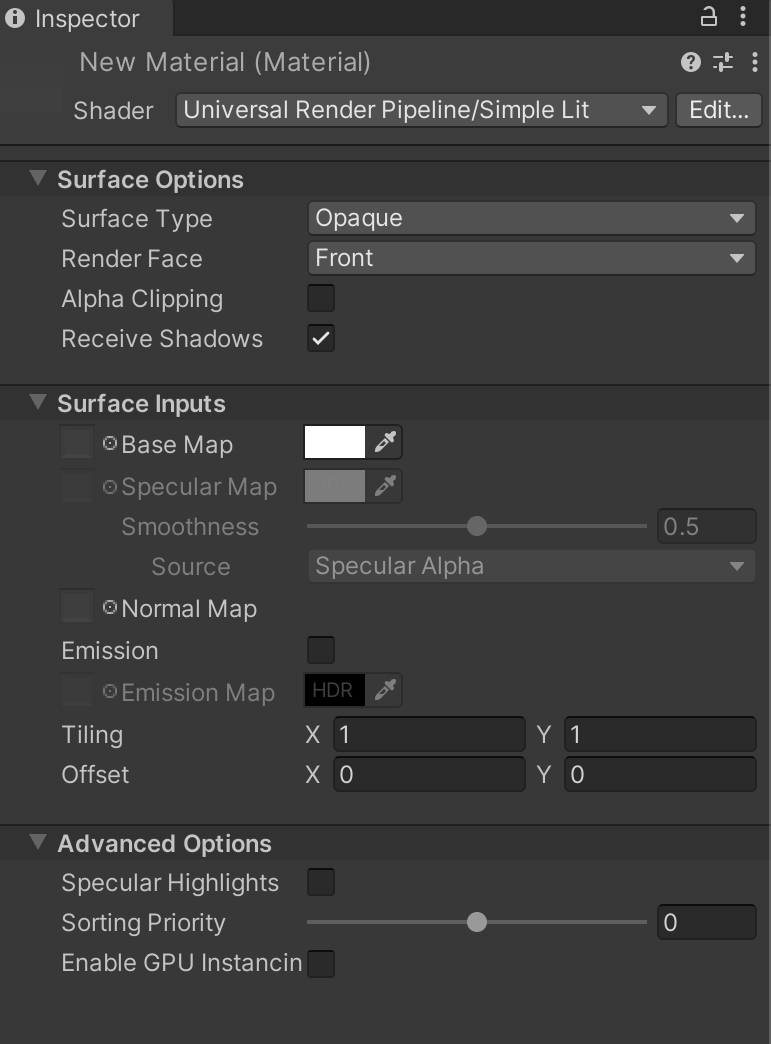
The Inspector window for this Shader contains these elements:
Surface Options
The Surface Options control how URP renders the Material on a screen.
| Property | Description |
|---|---|
| Surface Type | Use this drop-down to apply an Opaque or Transparent surface type to the Material. This determines which render pass URP renders the material in. Opaque surface types are always fully visible, regardless of what’s behind them. URP renders opaque Materials first. Transparent surface types are affected by their background, and they can vary according to which type of transparent surface type you choose. URP renders transparent Materials in a separate pass after opaque objects. If you select Transparent, the Blending Mode drop-down appears. |
| Blending Mode | Use this drop-down to determine how URP calculates the color of each pixel of the transparent Material by blending the Material with the background pixels. Alpha uses the Material’s alpha value to change how transparent an object is. 0 is fully transparent. 1 appears fully opaque, but the Material is still rendered during the Transparent render pass. This is useful for visuals that you want to be fully visible but to also fade over time, like clouds. Premultiply applies a similar effect to the Material as Alpha, but preserves reflections and highlights, even when your surface is transparent. This means that only the reflected light is visible. For example, imagine transparent glass. Additive adds an extra layer to the Material, on top of another surface. This is good for holograms. Multiply multiplies the color of the Material with the color behind the surface. This creates a darker effect, like when you look through colored glass. |
| Render Face | Use this drop-down to determine which sides of your geometry to render. Front Face renders the front face of your geometry and culls the back face. This is the default setting. Back Face renders the front face of your geometry and culls the front face. Both makes URP render both faces of the geometry. This is good for small, flat objects, like leaves, where you might want both sides visible. |
| Alpha Clipping | Makes your Material act like a Cutout Shader. Use this to create a transparent effect with hard edges between the opaque and transparent areas. For example, to create blades of grass. To achieve this effect, URP does not render alpha values below the specified Threshold, which appears when you enable Alpha Clipping. You can set the Threshold by moving the slider, which accepts values from 0 to 1. All values above your threshold are fully opaque, and all values below your threshold are invisible. For example, a threshold of 0.1 means that URP doesn't render alpha values below 0.1. The default value is 0.5. |
| Color Mode | Use this drop-down to determine how the particle color and the Material color blend together. Multiply produces a darker final color by multiplying the two colors. Additive produces a brighter final colour by adding the two colours together.</br/>Subtractive subtracts the particle color from the base color of the Material. This creates an overall dark effect in the pixel itself, with less brightness. Overlay blends the particle color over the base color of the Material. This creates a brighter color at values over 0.5 and darker colors at values under 0.5. Color uses the particle color to colorize the Material color, while keeping the value and saturation of the base color of the Material. This is good for adding splashes of color to monochrome Scenes. Difference returns the difference between both color values. This is good for blending Particle and Material colors that are similar to each other. |
Surface Inputs
The Surface Inputs describe the surface itself. For example, you can use these properties to make your surface look wet, dry, rough, or smooth.
| Property | Description |
|---|---|
| Base Map | Adds color to the surface. To assign a Texture to the Base Map setting, click the object picker next to it. This opens the Asset Browser, where you can select from the Textures in your Project. Alternatively, you can use the color picker. The color next to the setting shows the tint on top of your assigned Texture. To assign another tint, you can click this color swatch. If you select Transparent or Alpha Clipping under Surface Options, your Material uses the Texture’s alpha channel or color. The Base Map is also known as a diffuse map. |
| Specular Map | Controls the color of your specular highlights from direct lighting, for example Directional, Point, and Spot lights. To assign a Texture to the Specular Map setting, click the object picker next to it. This opens the Asset Browser, where you can select from the Textures in your Project. Alternatively, you can use the color picker. In__ Source__, you can select a Texture in your Project to act as a source for the smoothness. By default, the source is the alpha channel for this Texture. You can use the Smoothness slider to control the spread of highlights on the surface. 0 gives a wide, rough highlight. 1 gives a small, sharp highlight like glass. Values in between 0 and 1 produce semi-glossy looks. For example, 0.5 produces a plastic-like glossiness. Note: If this setting appears greyed out, check if Specular Highlights are enabled under the Advanced settings. |
| Normal Map | Adds a normal map to the surface. With a normal map, you can add surface details like bumps, scratches and grooves. To add the map, click the object picker next to it. The normal map picks up ambient lighting in the environment. |
| Emission | Makes the surface look like it emits lights. When enabled, the Emission Map and Emission Color settings appear. To assign an Emission Map, click the object picture next to it. This opens the Asset Browser, where you can select from the textures in your Project. For Emission Color, you can use the color picker to assign a tint on top of the color. This can be more than 100% white, which is useful for effects like lava, that shines brighter than white while still being another color. If you have not assigned an Emission Map, the Emission setting only uses the tint you’ve assigned in Emission Color. If you do not enable Emission, URP sets the emission to black and does not calculate emission. |
Advanced
The Advanced settings affect behind-the-scenes rendering. They do not have a visible effect on your surface, but on underlying calculations that impact performance.
| Property | Description |
|---|---|
| Flip-Book Blending | Tick this box to blend flip-book frames together. This is useful in texture sheet animations with limited frames, because it makes animations smoother. If you have performance issues, try turning this off. |
| Specular Highlights | When enabled, your particles have specular highlights from direct lighting, for example Directional, Point, and Spot lights. This means that each particle reflects the shine from these light sources. When disabled, these highlight calculations are not part of the Shader, which can make the Shader render faster. By default, this feature is enabled. |
| Vertex Streams | This list shows the vertex streams that this Material requires in order to work properly. If the vertex streams aren’t correctly assigned, the Fix Now button appears. Click this button to apply the correct setup of vertex streams to the Particle System that this Material is assigned to. |
| Sorting Priority | Use this slider to determine the chronological rendering order for a Material. URP renders Materials with lower values first. You can use this to reduce overdraw on devices by making the pipeline render Materials in front of other Materials first, so it doesn't have to render overlapping areas twice. This works similarly to the render queue in the built-in Unity render pipeline. |
Transparent surface type
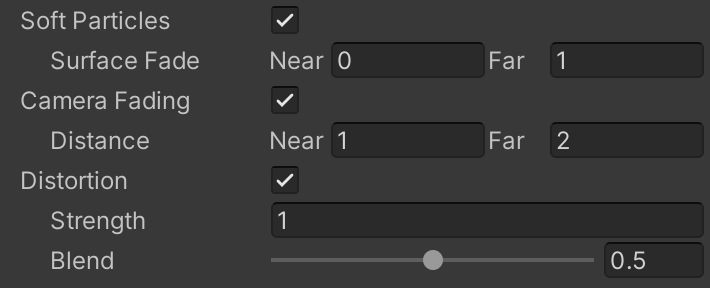
If you’ve chosen a Transparent surface type under Surface Options, these options appear:
| Property | Description |
|---|---|
| Soft Particles | Tick this box to make particles fade out when they get close to intersecting with the surface of other geometry written into the depth buffer. When you enable this feature, the Surface Fade settings appear: Near sets the distance from the other surface where the particle is completely transparent. This is where the particle appears to fade out completely. Far sets the distance from the other surface where the particle is completely opaque. The particle appears solid here. Distances are measured in world units. Only usable for transparent surface types. Note: This setting uses the CameraDepthTexture that is created by URP. To use this setting, enable Depth Texture in the URP Asset or for the Camera that is rendering the particles. |
| Camera Fading | Tick this box to make particles fade out when they get close to the camera. When you enable this feature, the Distance settings appear: Near sets the distance from the camera where the particle is completely transparent. This is where the particle appears to fade out completely. Far sets the distance from the camera where the particle is completely opaque. The particle appears solid here. Distances are measured in world units. Note: This uses the CameraDepthTexture that is created by URP. To use this setting, enable Depth Texture in the URP Asset or for the Camera that is rendering the particles. |
| Distortion | Creates a distortion effect by making particles perform refraction with the objects drawn before them. This is useful for creating a heat wave effect or for warping objects behind the particles. When you enable this feature, these settings appear: Strength controls how much the Particle distorts the background. Negative values have the opposite effect of positive values. So if something was offset to the right with a positive value, the equal negative value offsets it to the left. Blend controls how visible the distortion is. At 0, there is no visible distortion. At 1, only the distortion effect is visible. Note: This uses the CameraOpaqueTexture that is created by URP. To use this setting, enable Opaque Texture in the URP Asset or for the Camera that is rendering the particles. |

